How to Make a Hunting Seat For Deer Hunting
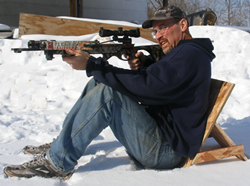 This homemade deer hunting seat is meant for those wanting to stay low to the ground when either still hunting or hunting from a low blind, such as a blind made of natural materials or the crossbow deer hunting blind featured on this site. Also, from this position, you can steady a gun or crossbow nicely. It costs about $15, assuming you have to buy the wood, but most people have these type of wood pieces laying around. This seat will allow you to sit for long periods of time low to the ground and it folds up so it is portable. The carpet piece that you sit on will keep the seat from sliding back. This homemade deer hunting seat is meant for those wanting to stay low to the ground when either still hunting or hunting from a low blind, such as a blind made of natural materials or the crossbow deer hunting blind featured on this site. Also, from this position, you can steady a gun or crossbow nicely. It costs about $15, assuming you have to buy the wood, but most people have these type of wood pieces laying around. This seat will allow you to sit for long periods of time low to the ground and it folds up so it is portable. The carpet piece that you sit on will keep the seat from sliding back.
Materials for Seat
-
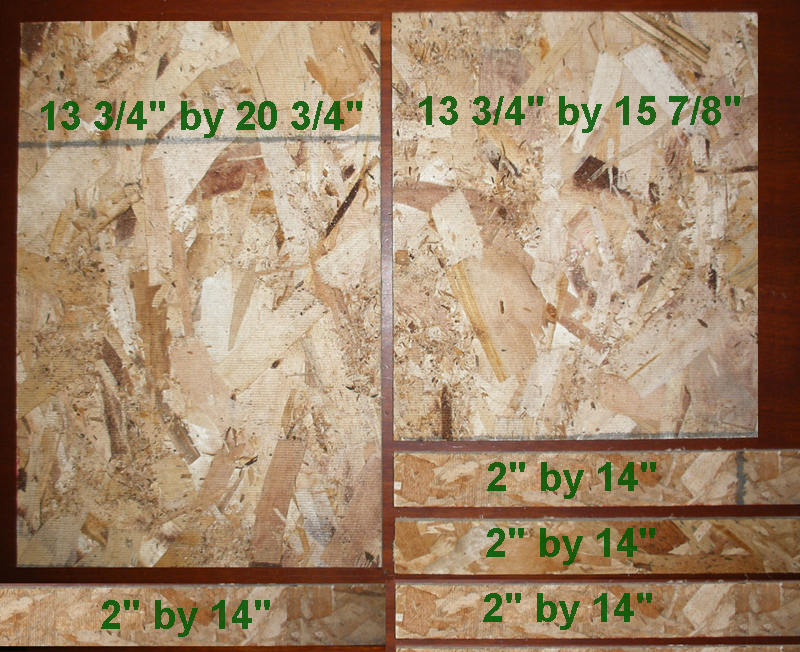
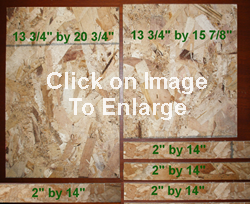
1/2" plywood or OSB pieces of dimensions 15 7/8" by 13 3/4" and 20 3/4" by 13 3/4"
- (4) 1 1/2" by 5/8" corner braces
- (4) 3" by 5/8" mending braces
- (2) 2.5" or 3" hinges
- (4) 2 inch wide, 12-14" long pieces of 1/2" OSB or Plywood
- (1) 12" by 16" scrap of carpet - should be flexible
- 5/8" or 1/2" screws to secure hinges and braces
- (4) 3/4" or 1" long screws to attach temporary braces
- Construction Adhesive
Step 1 - Cut Out Seat Pieces and Wood Strips
Rip pieces of 1/2" OSB or plywood to a width of 13 3/4" inch. Also rip strips of 2" wide OSB or plywood. A table saw is best for this although one may use a circular saw and a guide clamped onto the piece so as to make a straight cut. I used OSB since it does not curl should it get a little wet. Cut your two seat pieces to 20 3/4" and 15 7/8". Make your seat pieces at perfectly square as possible Also cut out your 2" strips to about 12 to 14" in length.
Step 2 - Attach Hinges
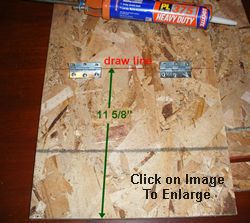
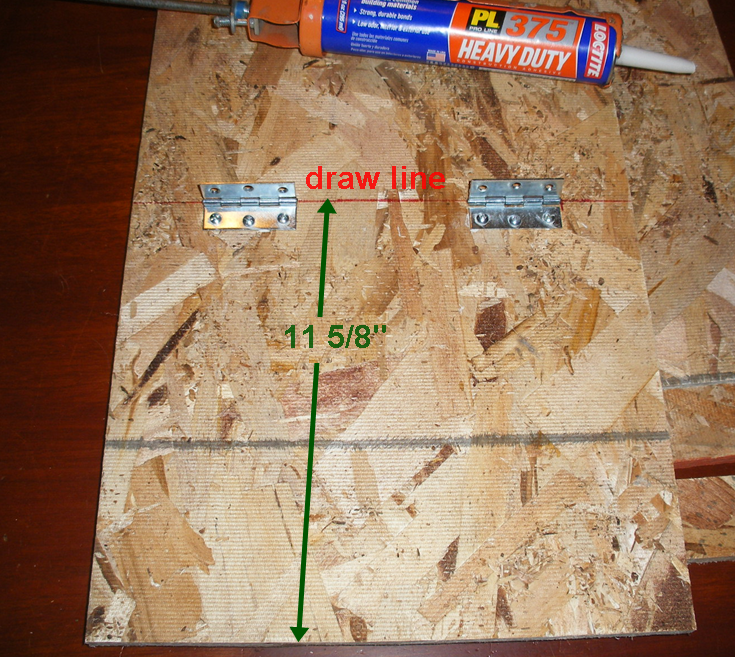
On your longer piece, measure 11 5/8" from one end and then draw a line with carpenter's pencil or sharpie marker on your piece. Make sure the line is square with the edges!
Attach your hinges about 2" from each edge as shown, lining up the hinges to the line. Attach your hinges with 1/2" or 5/8" screws, making sure the screws do not come through the other side (that will be up against your back).
Use construction adhesive between the hinges and the pieces and in the holes where the screws are inserted.
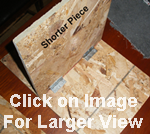
Attach your shorter piece as shown on the right.
Your two pieces should be hinged together now and should be square with each other, freely moving.
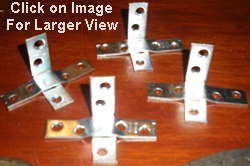
Step 3 - Prepare the Support Braces
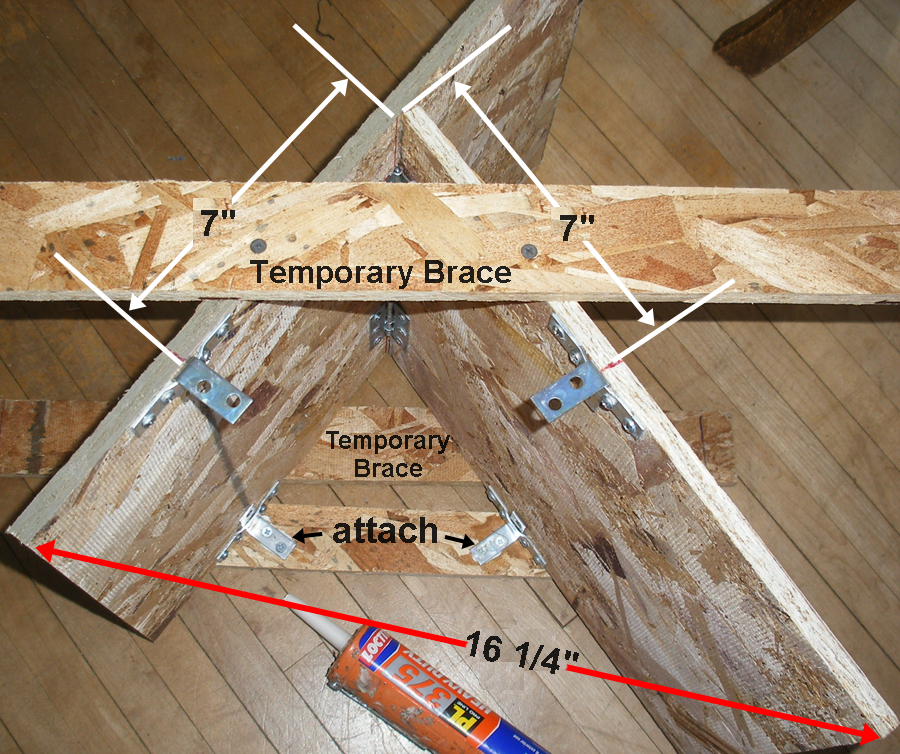
In this step, use either a vice-grips and another pair of pliers or a vice and a pair of pliers to bend the mending braces so the corner braces will fit under them, as shown. I was able to do this with just a vice grips and a pair of lineman's pliers. It is not as hard to do as you might think. See the photo on the right.
Step 4 - Attach Braces and Supports
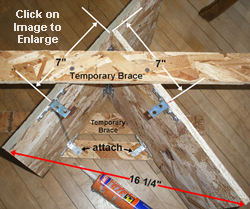
Attach the mending braces as shown in the photo on the right, 7" from the corner in each direction. Attach so the corner braces can slide in and out with a little friction. Again use some construction adhesive in addition to screws. Measure so the bottom edges are 16 1/4" apart, as shown. Then attach temporary braces on each side with a few 1" screws.. Then attach your permanent braces to the corner braces with screws and adhesive. Now, you may remove the temporary braces.
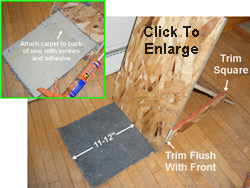
Step 6 - Trim Braces and Attach Carpet
In this step, trim the permanent braces off so the one side is flush with the front (cut at an angle) and the back is cut off square. By cutting this way, you can easily match the brace with its correct side.
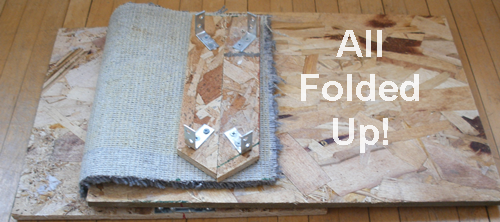
Attach the carpet to the the back of the longer square so that it extends out 11 to 12 inches in the front. I used 4 screws and some construction adhesive.The purpose of the carpet is to keep the seat from moving - your weight will pin it down nicely! After you attach the carpet, you are done. See the photo below of the seat when it is folded up.
|
 |

Share on Facebook
Click Ctrl D to Bookmark
This Page! Tell Your Friends! Click on The Share Button =>

|